|
Cheltenham Society of Model Engineers |
Next Public Afternoon (1330 - 1600hrs) |
|
|---|---|---|
| Boilers |   |
| Home | The Society | Calendars | Galleries | Projects | Attic | Links |
|---|
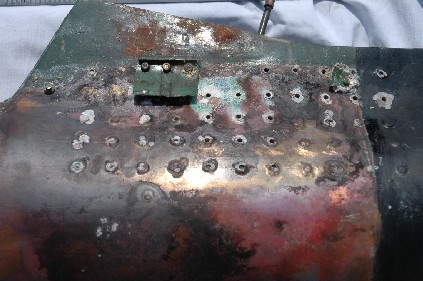
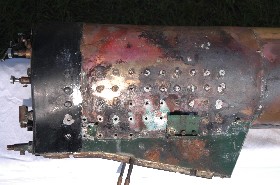
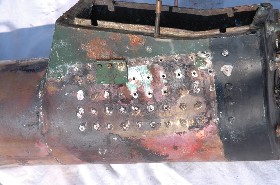
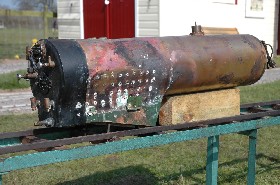
I had a very informative discussion with a guy from G.L.R. Distributors Ltd who had formerly been employed by Kennion's and who had constructed a number of satisfactory boilers for them. Apparently, on all boilers from 2.5"G and upwards they used 2BA Copper Stays threaded in both plates, and silver soldered. This is the method I have used on the Garratt Boiler - the only exception is on the forty odd Rod Crown Stays which are threaded on the inner firebox plate and reamed on the outer shell, and on the backhead as mentioned later. Now, if one is proposing to silver solder the stays, as I have done, then a different assembly procedure has to be used. Obviously one needs to make all the component parts, and assemble them together using a minimum of assembly holes. I chose to make up copper screws from the same material as the stays, i.e. 3/16" Head x 1/8"x40 Shank - clearance hole in one plate , tapped in t'other. The heads don't need to be posh, because you'll file them off at the end. Make sure all the bits fit well, including the foundation ring which you can assemble for the time being, with screws and nuts. Next, partly dismantle the assembly so as to have the firebox end of the boiler, this makes it easier to handle. Drill all the stay holes tapping size for 2BA and tap most of them. The exceptions are for the stay holes in the firebox backplate and backhead. These will be tapped at a later stage in order to make sure the holes are clean for brazing. I used washing-up liquid let down a bit as a tapping fluid. It washes off well, though a bit sticky in use. We are now ready to start putting our boiler together for keeps. Strip the boiler to pieces and thoroughly clean all the parts. Pickle and scrub up - a kitchen scourer is quite good - and don't forget to do the assembly screws. Start by fluxing and assembling the firebox wrapper with the tubeplate. Next temporarily bolt the front and side pieces of the foundation ring and the outer wrapper together, and screw the throat plate into place fluxing it where it joins the outer wrapper. If you are using plate crown stays, flux and screw them in place too. The next job is to screw lengths of the 3/16" copper rod 2BA. I did about 3" at a time in the lathe, using the washing-up fluid, and had several lengths of rod on the go. Wash before assembly. Screw the stay through both plates fluxing each hole as you go. Have about 3/32" projection on the inside, and cut off the rod leaving about the same projecting on the outside. Don't bother at this stage to make things look pretty, you can do that after silver soldering. Do all of the stays, including the Rod Crown Stays if you prefer them to plate ones. Remove the foundation ring pieces, and make sure that all the stays are adequately fluxed. Now apply plenty of heat silver soldering the tube plate seam, the throat plate seam and all the stays, including the plate stays if using them. Start on the inside of the firebox first then move to the outside. If you can enlist the help of a colleage then do so, and if necessary, use two torches and have flux and a scratch rod handy. You'll find little trouble in getting a Propane/Butane Burner to perform properly as there is plenty of air space. When done, quench in cold water - it cracks off most of the flux - pickle, wash off and examine. You should be able to see that the sliver solder has produced a nice fillet on both sides of each plate with the stay, and you should be able to see every one of the stays. If one looks doubtful, clean it up, reflux it and put it right before pressing on. With the assembly now clean, again tap the firebox backplate 2BA for the stays, and ream the backhead 3/16". Screw some copper stubs in long enough to project through the backhead when it is assembled. Build up and flux the firebox backplate, the firehole ring, the stub stays and assembly screws. Silver solder this sub-assembly in place. Re-clean by pickling and scouring, and make sure the areas where the Foundation Ring and the Firehole Ring/Backhead touches is spotless. Now assemble the Foundation Ring and the Backhead complete with its bushes (which are best dealt with as a sub-assembly, using a higher grade silver solder). The stub stays should stand proud about 3/32" as before. Silver solder all these in place. Once again it is clean up and check that the joints have taken well. We now come to the front end, and deal first with the tubes. I raise a small flange on the tubes about 3/16" from the end. This prevents the tubes from sliding into the firebox as the silver soldering takes place. Also I raise a small flange on three or four of the tubes at the smokebox end in order to support the smokebox tube plate in a similar manner. First silver solder the tubes into the firebox, using the smokebox tubeplate to hold the correct spacing. Guess what comes next! You're right! It's another cleaning session. Check that all the tubes have taken properly, and then clean up all of the tubes at the smokebox end for the final silver soldering operation. Clean, flux and position the barrel on the Firebox/Throatplate end and put in and flux any assembly screws. Flux and assemble the smokebox tubeplate complete with its bushes already silver soldered in as mentioned before, and you are ready for the final silver soldering operation, clean up and inspection. I haven't mentioned and bushes for clacks, safety valves, water gauges, dome bushes etc. Naturally I give some credit to builders for knowing they have to be put in, and that they will be dealt with as sub-assemblies as described above. If anyone is interested in the tube flanging gadgett please let it be known, it takes an hour or two to make and serves all sizes of copper tube we are likely to encounter in 2.5"G - 5"Gauges, but you could make it a bit bigger for larger tubes. I hope the above might be helpful. BOB JONES |
|---|


| Hatherley Lane, Cheltenham, Glos, GL51 6PN, UK | cheltsocietymodelclub@gmail.com | Tel: TBD | Legal Notices |
|---|
| Home | The Society | Calendars | Galleries | Projects | Attic | Links |
|---|